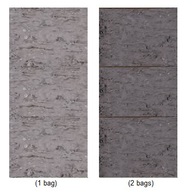
OXIDE - MONSOON -17LBS
Interstar
#NR-5157-17
Ready-Mix Colors. Concentrated powdered concrete colors. Interstar Concrete Colors are pure iron oxide mineral pigments designed to be used specifically in integral coloring of cementitious materials, whether it be Portland cement or concrete products. Interstar Colors are certified ASTM C979 for integral coloring. Interstar Concrete Colors are available in several standard colors. In addition, the color development and matching services of the Interstar Color Laboratory offer controlled, custom blended pigments to meet your own special color requirements.

Interstar’s Ready Mix pigments have been used throughout North America to create beautiful, vibrant colored concrete structures. Colored concrete reduces visual pollution on highways, transforms ordinary flooring into a stunning show piece, and adds beauty to airports. In short, colored concrete turns the ordinary into the extraordinary. Interstar’s Ready Mix pigments are available in a wide variety of colors and can be custom blended to suite the needs of our customers.
- INTERSTAR Pigment can be added to any concrete mix.
- INTERSTAR pigments are packaged in premeasured bags that disintegrate in the concrete for easy, clean use.
- Easy Dispersing
- Pre-weighted dissolving multi-wall paper bags
- 1 bag = 1 cubic yard
- Reduces human error
- Maximum coloring power
- Dust-free
- Wide variety of colors
- Sunfast
- Free of delirious fillers and extenders
- Decorative concrete
- Sidewalks
- Patios
- Driveways
- Precast
- Poured in place concrete construction
Mixing
- Step 1: The truck mixer drum must be completely clean with no leftover water or aggregate before mixing a batch of colored concrete.
- Step 2: The slump must range from 90 mm to 100 mm (3 1/2" to 4"). If air is entrained, it should range from 5% to 7%.
- Step 3: Put the drum in reverse (discharge) to shift the concrete toward the back of the drum and then stop the drum. Place the bags of pigment directly onto the concrete, then place the drum in forward (mix)
- Step 4: Let it turn slowly (5 rpm) for 2 or 3 minutes.
- Step 5: Then let the mixer run at optimum speed (12 rpm) for 10 to 15 minutes.
Caution: Never add extra water to a batch of colored concrete. Any differences in slump in successive batches will result in color variations in the concrete. Never use calcium chlorides or any accelerators.
Finishing
- Step 1: Place the concrete, then strike it off using recognized methods.
- Step 2: Once the concrete has been struck off, use a vibrating screed or a magnesium float. Take care to work in one direction.
- Step 3: Waiting period (do not allow the concrete to get too hard). Allow sufficient time for the concrete to set; rushing the other steps can alter the final appearance of the concrete.
- Step 4: Initial floating should be halted if there is any bleed water on the surface of the concrete (bleed water can result in scaling). Floating can be continued once the bleed water has evaporated. Stamping is the next step, if it is to be carried out.
- Step 5: A power trowel or magnesium hand float can be used for a smooth finish, but over-working the surface will cause discoloration.
Caution: Never fog the surface of the concrete with water; never wet the tools during use. The use of water will result in discoloration and may even damage the surface of the concrete.
See Technical Information for More Details.
Due to color variations of various types of printers, colors presented on this website offer only an approximation of the actual color. You should use this color chart for a primary color selection only
